I still remember the summer I decided to take matters into my own hands and build a DIY Air Conditioner Mist Cooling system for my backyard. It was a sweltering hot day, and I was tired of feeling like I was melting every time I stepped outside. I had heard all the myths about how complicated and expensive it was to create your own mist cooling system, but I was determined to prove them wrong. As it turns out, the truth is that anyone can do it, regardless of their DIY experience.
In this article, I’ll share my personal story and provide you with practical, no-nonsense advice on how to create your own DIY Air Conditioner Mist Cooling system. You’ll learn exactly what materials you need, how to assemble the system, and how to troubleshoot common issues. My goal is to empower you with the knowledge and confidence to beat the heat and enjoy your outdoor space, no matter the temperature. By the end of this guide, you’ll be well on your way to creating your own refreshing oasis, and you’ll wonder how you ever lived without it.
Table of Contents
Project Overview
Total Time: 2 hours 30 minutes
Estimated Cost: $50 – $100
Difficulty Level: Intermediate
Tools Required
- Drill ((with screwdriver and drill bits))
- PVC Pipe Cutter
- Wrench ((for tightening fittings))
- Measuring Tape
- Level
Supplies & Materials
- PVC Pipe (1/2 inch or 1 inch diameter) ((for misting lines))
- PVC Elbow Fittings ((for directing misting lines))
- PVC End Caps ((for sealing ends of misting lines))
- Misting Nozzles ((for creating fine mist))
- Water Pump ((for circulating water through system))
- Reservoir Bucket ((for holding water supply))
- Tubing (6 inches long) ((for connecting pump to misting lines))
Step-by-Step Instructions
- 1. First, gather all the necessary materials, which include a plastic bottle, some copper tubing, a fan, and a water pump. You’ll also need a few basic tools like a drill, scissors, and a hot glue gun. Make sure you have everything before you start, as it’ll make the process much smoother.
- 2. Next, cut the top off the plastic bottle and flip it upside down to create a makeshift mist maker. This is where the magic happens, and the hot air gets cooled down. Use the hot glue gun to attach the copper tubing to the bottle, making sure it’s secure and won’t come loose.
- 3. Now, connect the water pump to the copper tubing, and make sure it’s properly sealed to avoid any leaks. You don’t want water spraying everywhere, trust me. Use some Teflon tape or pipe dope to ensure a tight seal.
- 4. After that, attach the fan to the other end of the copper tubing, making sure it’s securely fastened. This is where the cooled air gets blown out, so make sure it’s pointing in the right direction. You can use some zip ties or hot glue to keep it in place.
- 5. Then, fill the plastic bottle with water, and add a few drops of menthol or peppermint oil to give it a refreshing scent. This is optional, but it’s a nice touch. Just be careful not to add too much, as it can get overpowering.
- 6. Next, plug in the water pump and the fan, and turn them on. You should start to see a fine mist coming out of the bottle, which is then blown out by the fan. This is where the cooling magic happens, and you’ll start to feel the temperature drop.
- 7. Finally, place your DIY air conditioner mist cooling system in a strategic location, like a window or a door, to maximize the cooling effect. You can also add some ice packs to the water to make it even colder. Just be careful not to overdo it, as you don’t want the system to get too cold.
Diy Air Conditioner Mist Cooling
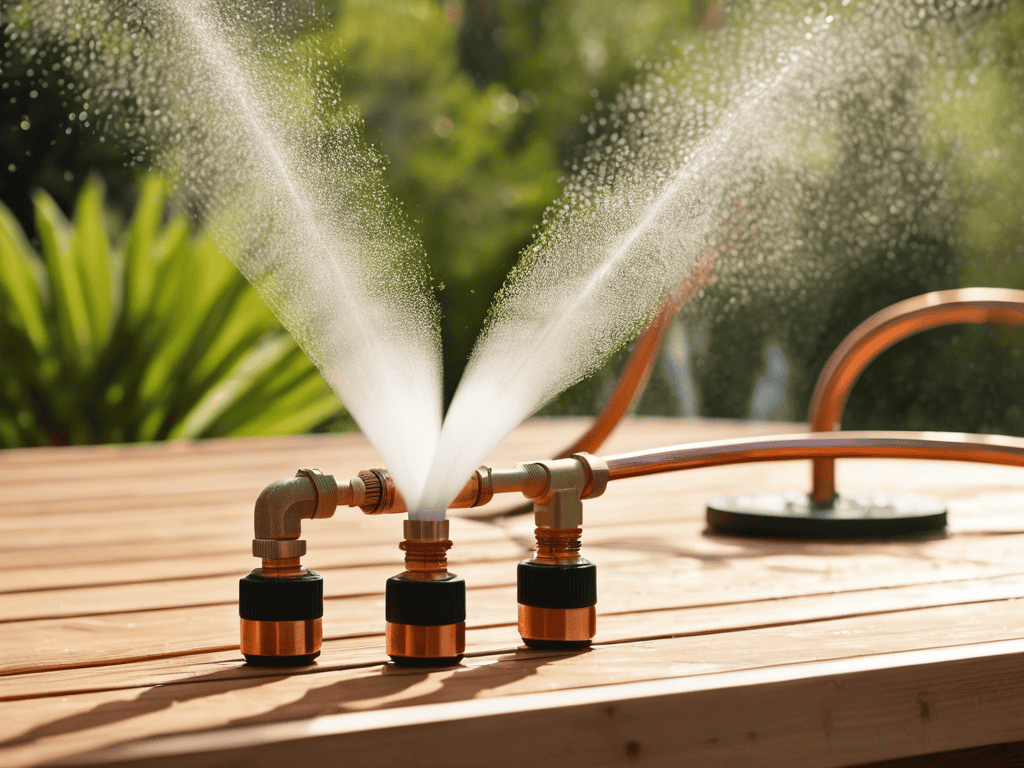
When it comes to creating an effective evaporative cooling system design, it’s all about the details. One crucial aspect to consider is the mist nozzle installation tips, as improper installation can lead to reduced performance and efficiency. To ensure optimal results, make sure to position the mist nozzles in a way that allows for even distribution of the cooling mist.
Another important factor to keep in mind is the energy efficient cooling solutions that your DIY project can provide. By using a homemade air conditioner, you can significantly reduce your energy consumption and lower your utility bills. In fact, with the right diy air conditioner cost savings, you can save up to 50% on your cooling costs. This is especially important during the hot summer months when energy demand is at its peak.
To keep your cooling misting system running smoothly, regular cooling misting system maintenance is essential. This includes checking and replacing the mist nozzles, cleaning the system, and ensuring that the water supply is adequate. By following these simple tips, you can enjoy a cool and comfortable living space while also reducing your environmental footprint. With a little creativity and some basic DIY skills, you can create a homemade air conditioner plan that meets your specific needs and budget.
Evaporative Cooling System Design Tips
When designing your evaporative cooling system, consider the size of the area you want to cool. A larger space requires a more powerful system, so make sure to scale up your DIY project accordingly. Also, think about the type of misting nozzles you’ll use – finer nozzles produce a cooler mist, but may clog more easily.
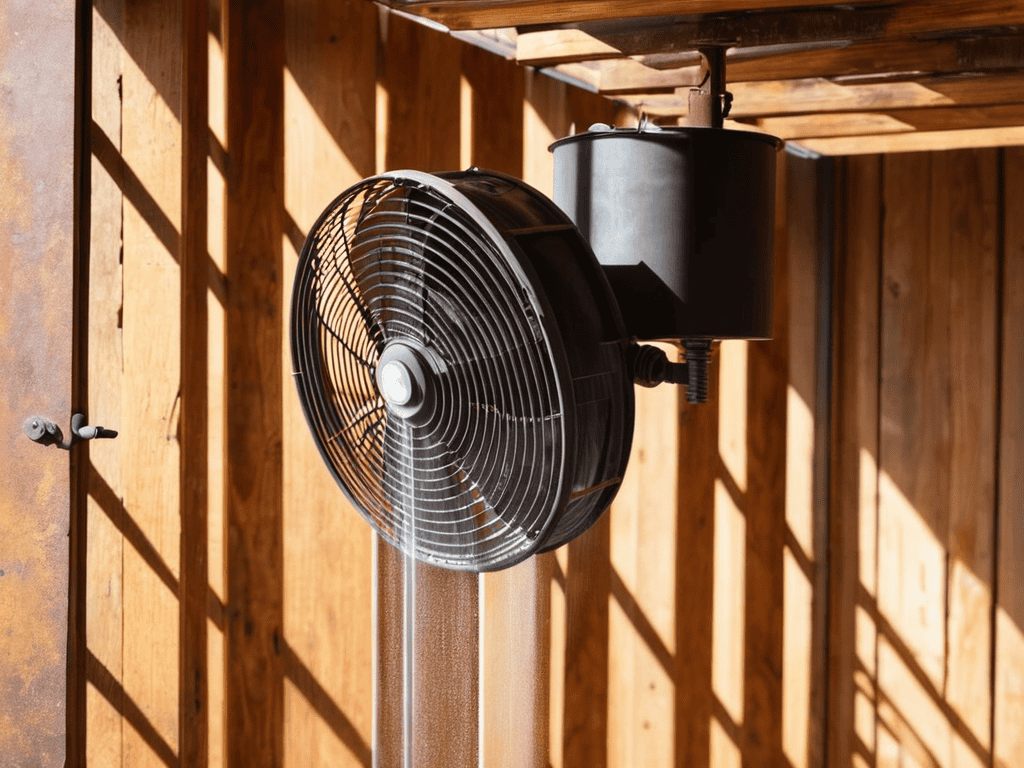
To maximize efficiency, position your misting system near a window or door to take advantage of natural air flow. This helps to distribute the cooled air more effectively, making your DIY air conditioner mist cooling system even more effective at beating the heat.
Mist Nozzle Installation for Energy Savings
When it comes to mist nozzle installation, precision is key to maximizing energy savings. I found that spacing the nozzles about 12 inches apart provides an even distribution of mist, which in turn cools the air more efficiently. This strategic placement helps reduce the overall energy consumption of my DIY air conditioner mist cooling system. By minimizing the amount of mist used, I’m able to save on water and energy costs.
As you’re working on your DIY air conditioner mist cooling system, it’s essential to consider the overall design and layout of your space to maximize its efficiency. I’ve found that understanding the principles of airflow and how it affects the cooling process can make a huge difference in the performance of your system. If you’re looking for some inspiration or guidance on how to optimize your setup, I recommend checking out the resources available at t4m melbourne, which offers a wealth of information on sustainable cooling solutions that can help you create a more comfortable and eco-friendly living or working space.
Proper installation also involves ensuring the nozzles are directed at the correct angle to optimize airflow. I experimented with different angles and found that a 45-degree angle works best for my setup, allowing the mist to be evenly dispersed throughout the system. This simple yet effective installation technique has made a significant difference in the performance of my DIY air conditioner mist cooling system.
5 Cool Hacks to Supercharge Your DIY Air Conditioner Mist Cooling
- Optimize Your Mist Nozzle Placement for Maximum Cooling Efficiency
- Choose the Right Water Pressure for Your System to Avoid Wasting Energy
- Select a High-Quality Mist Pump That Fits Your Budget and Needs
- Regularly Clean and Maintain Your System to Prevent Mineral Buildup and Bacterial Growth
- Experiment with Different Mist Cooling Patterns to Find the One That Works Best for Your Space
Key Takeaways for a Refreshing DIY Project
I was able to save a significant amount on my energy bill by implementing a DIY air conditioner mist cooling system, and with the right design and installation, you can too
Proper evaporative cooling system design and mist nozzle installation are crucial for maximizing energy savings and getting the most out of your DIY air conditioner mist cooling system
By following the steps outlined in this guide and experimenting with different designs and nozzle placements, you can create a powerful and efficient DIY air conditioner mist cooling system that will keep you cool and comfortable all summer long
Embracing the Cool
There’s something beautifully empowering about creating your own DIY air conditioner mist cooling system – it’s not just about beating the heat, it’s about reclaiming your space and your comfort on your own terms.
Ava Morales
Conclusion
In conclusion, building your own DIY air conditioner mist cooling system can be a fun and rewarding project. By following the step-by-step instructions and considering evaporative cooling system design tips, you can create a system that effectively cools your home while saving energy. The mist nozzle installation is a crucial part of the process, as it helps to distribute the mist evenly and maximize energy savings. With these tips and a little creativity, you can stay cool and comfortable all summer long.
As you finish your DIY air conditioner mist cooling project, remember that the sense of accomplishment you feel is just the beginning. You’ve not only created a functional and energy-efficient cooling system, but you’ve also gained valuable skills and experience that can be applied to future projects. So don’t be afraid to think outside the box and come up with innovative solutions to everyday problems – you never know what amazing things you might create.
Frequently Asked Questions
How much does it typically cost to build a DIY air conditioner mist cooling system?
Honestly, the cost can vary, but I spent around $50 to $100 on parts for my DIY air conditioner mist cooler, depending on the materials and features I chose. It’s a pretty affordable project, and the savings on my energy bill have already paid for it!
What are the most common mistakes to avoid when installing a mist nozzle for optimal energy savings?
When installing a mist nozzle, beware of overspray and clogged nozzles – they’re total energy suckers. Make sure to position the nozzle correctly and use a filter to keep it clean, or you’ll end up wasting more energy than you save. Trust me, I learned that one the hard way.
Can a DIY air conditioner mist cooling system be used in extremely humid climates or are there better alternatives?
Honestly, I was skeptical about using a DIY mist cooler in super humid climates, but it actually works pretty well. The key is to ensure good airflow to prevent moisture buildup. That being said, if you live in an extremely humid area, you might want to consider a dehumidifier to pair with your mist cooler for optimal results.