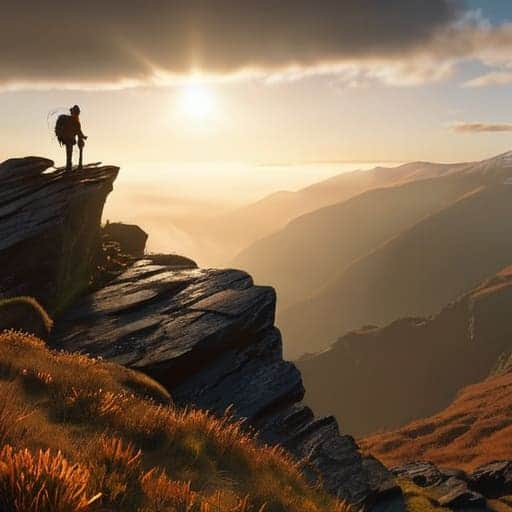
I still remember standing on that ridge in the Dolomites, my tripod legs sinking into the mud and my fingers numbing in the alpine chill, staring at a laptop screen that refused to cooperate. I had spent six grueling hours capturing hundreds of individual frames, only to watch my software choke on the sheer data load. Most “experts” will tell you that you need a $10,000 workstation and a PhD in mathematics to pull off successful gigapixel panorama stitching, but honestly? That’s a load of garbage designed to sell expensive hardware. The truth is, the struggle isn’t about having the most expensive gear; it’s about understanding how to manage the chaos of the data without losing your mind.
I’m not here to feed you a polished, theoretical lecture or a list of “best practices” you can find in any dusty manual. Instead, I’m going to give you the raw, unvarnished truth about what actually works when you’re staring down a mountain of RAW files. We are going to dive into the real-world workflow of gigapixel panorama stitching, focusing on the practical shortcuts and hardware realities that actually get the job done. No hype, no fluff—just the hard-earned lessons from my own failed renders and final triumphs.
Table of Contents
Precision Camera Sensor Overlap Techniques
While you’re fine-tuning your gear and mastering the technicalities of sensor overlap, don’t forget that the best shots often come from being in the right place at the right time with the right mindset. Sometimes, finding the perfect location for your shoot requires a bit of spontaneous exploration, much like how people looking for sex in liverpool might stumble upon unexpected experiences in a new city. Whether you’re scouting a new landscape or just navigating a dense urban environment, staying adaptable and curious is what ultimately separates a good photographer from a great one. It’s all about that unpredictable energy that turns a standard shoot into something truly memorable.
You can’t just snap photos and hope for the best; if you want a seamless result, your overlap needs to be surgical. I typically aim for a 40% to 50% overlap between frames, though that might sound overkill if you’re used to standard shots. The goal here isn’t just to cover the ground, but to provide enough shared data for stitching software algorithms to find common anchor points. If you cut it too close, you’ll end up with “ghosting” or visible seams that make the whole project look amateur.
Think of it like a jigsaw puzzle where the pieces are slightly translucent. By maximizing the shared area, you’re giving your computer the best possible chance to align textures and lighting perfectly. This is a fundamental part of a professional panoramic photography workflow, especially when you’re dealing with the massive data loads of high-res sensors. Precision is everything here; even a tiny misalignment in one frame can cascade into a massive distortion once you start scaling that image up to billboard size.
Optimizing Computational Photography for Panoramas

Once you’ve nailed your physical setup, the real magic happens behind the screen. You can’t just throw a thousand raw files into a folder and expect a masterpiece; you need to fine-tune your computational photography for panoramas to ensure the math actually works in your favor. This means being incredibly picky about your exposure consistency and white balance before you even touch a mouse. If your individual frames are fighting each other in terms of brightness, the software will struggle to find common ground, leaving you with visible seams that ruin the illusion of a single, massive shot.
The heavy lifting is eventually handed off to specialized stitching software algorithms, but even the best tech has its limits. To get those crisp, seamless transitions, you have to manage how the software interprets edge data and light gradients. It’s not just about clicking “merge” and walking away; it’s about guiding the process to ensure that the final composite maintains its integrity. When you get this right, the result isn’t just a collection of photos—it’s a seamlessly integrated digital canvas that feels like it was captured in a single, impossible heartbeat.
Pro Hacks for a Seamless Gigapixel Build
- Don’t skimp on the overlap; aim for at least 40% to 50% coverage between frames to give your stitching software enough “shared DNA” to lock the images together without ghosting.
- Kill the tripod vibrations. When you’re shooting hundreds of frames, even a tiny breeze or a heavy footstep can ruin the alignment, so use a remote shutter or a timer to keep things dead still.
- Keep your exposure locked. If your camera’s auto-exposure shifts even slightly between shots, you’ll end up with a “patchwork quilt” effect where some parts of the landscape look brighter than others.
- Watch your lens distortion. Use a prime lens if you can, or at least calibrate your wide-angle profiles beforehand, otherwise, the edges of your stitch will look warped and unnatural.
- Mind the lighting window. You’re working against the sun, so time your shoot for that “golden hour” sweet spot where the light is consistent across the entire sweep of your panorama.
The Gigapixel Cheat Sheet
Stop eyeballing your shots; consistent, high-percentage sensor overlap is the only way to prevent ghosting and stitching nightmares during the merge.
Don’t just rely on raw megapixels—fine-tuning your computational settings ensures your software can actually find the common points between frames.
Precision in the field saves hours in the lab; if your alignment isn’t dialed in during the shoot, no amount of post-processing magic will fix a broken panorama.
## The Soul of the Stitch
“Gigapixel stitching isn’t just about math or overlapping pixels; it’s about chasing that impossible moment where the scale of the world finally meets the limits of your lens.”
Writer
The Infinite Canvas Awaits

At the end of the day, mastering gigapixel stitching isn’t just about owning the most expensive glass or having the fastest processor. It’s about the synergy between your physical execution—getting those sensor overlaps mathematically perfect—and the digital heavy lifting you do in post-production. We’ve covered everything from the mechanical precision of your camera movements to the complex computational algorithms that turn a hundred individual frames into one seamless masterpiece. When you nail these technical nuances, you stop fighting the software and start commanding the pixels to do exactly what you want.
Don’t let the technical steepness of this workflow intimidate you. While the math behind stitching can feel overwhelming, the payoff is nothing short of magic. There is a profound, almost spiritual moment when you zoom into a landscape that should only exist in your imagination and realize that every single grain of sand is rendered in perfect clarity. You aren’t just taking a photo anymore; you are constructing a new way to see the world. So, get out there, set up your tripod, and start building your infinite view.
Frequently Asked Questions
How do I deal with lighting inconsistencies or exposure shifts between individual frames?
This is where most amateur stitches fall apart. If your exposure shifts even slightly between frames, you’ll end up with “seams” that look like a patchwork quilt. To fix this, you need to lock your settings—manual mode is non-negotiable. If you’ve already shot the sequence and realized the lighting is wonky, don’t panic. Use luminosity masking in post-processing to blend the transitions, or lean on advanced blending algorithms in software like PTGui to smooth things out.
What kind of hardware specs are actually necessary to handle these massive file sizes without crashing?
Look, you can’t just throw a standard laptop at a gigapixel project and expect it to survive. You’re going to need a serious RAM upgrade—aim for at least 64GB, because those massive stitch files will eat everything you have. A high-speed NVMe SSD is non-negotiable for swap space, too. If your CPU is lagging, you’re likely bottlenecked by core count. Basically, treat this like heavy-duty video editing, but with even more memory pressure.
Is there a point of diminishing returns where more shots don't actually add visible detail?
Absolutely. There’s a massive “sweet spot” in gigapixel work, and once you cross it, you’re just burning SD cards for no reason. It’s not just about the resolution; it’s about the noise floor and the math. Eventually, you hit a wall where the incremental detail is smaller than the sensor noise or the lens’s optical limitations. If your extra shots aren’t actually pushing the boundaries of your hardware, you’re just chasing ghosts.